Build your Pokédex: Part 1 - Introduction to NgRX
• • 24 min readThis post is part of a Series of post on which I'm describing how to build your Pokédex using NGRX from beginner to ninja, if you want to read more, you can read the following posts:
- Part 1. Build your Pokédex: Introduction to NGRX
- Part 2. Build your Pokédex: @ngrx/entity
- Part 3. Build your Pokédex: Improve NgRX using create* functions
- Part 4. Build your Pokédex: @ngrx/data
- Part 5. Build your Pokédex: Testing NgRX
Introduction
In this post, we will develop the development of a pokédex using Angular framework and NgRX as a state management library.
It is advisable to know how to manage Angular at an intermediate level and know what a state management library is in order to understand this post properly, because, in this series, we will show how a specific example has been developed (Pokédex), which can be a complement to your NgRX learning.
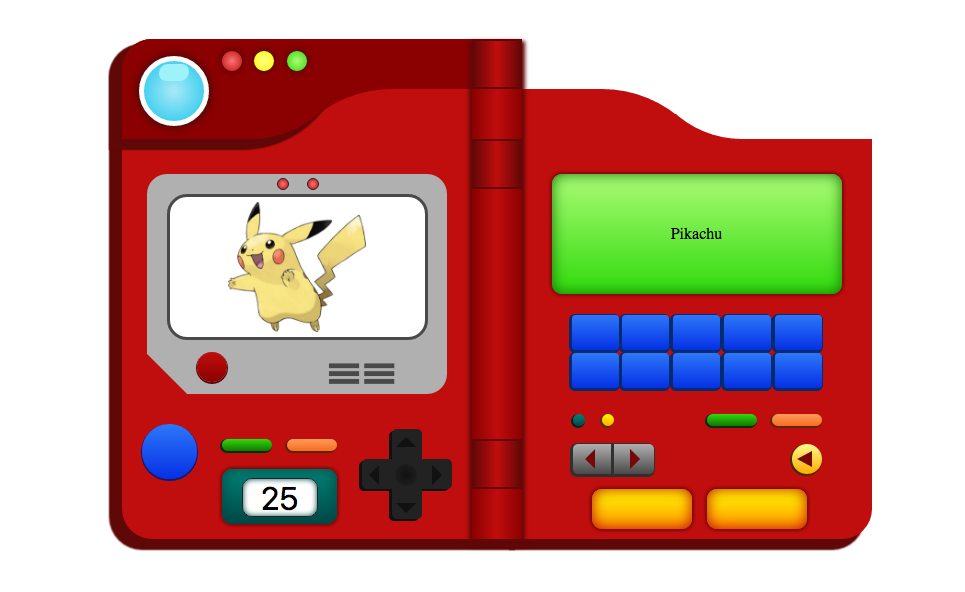
First, the result of what will be built along these posts is shown in the following GIF.
The directory structure of our project is as shown below (you can read the post about Angular's Architecture from AngularAcademy:
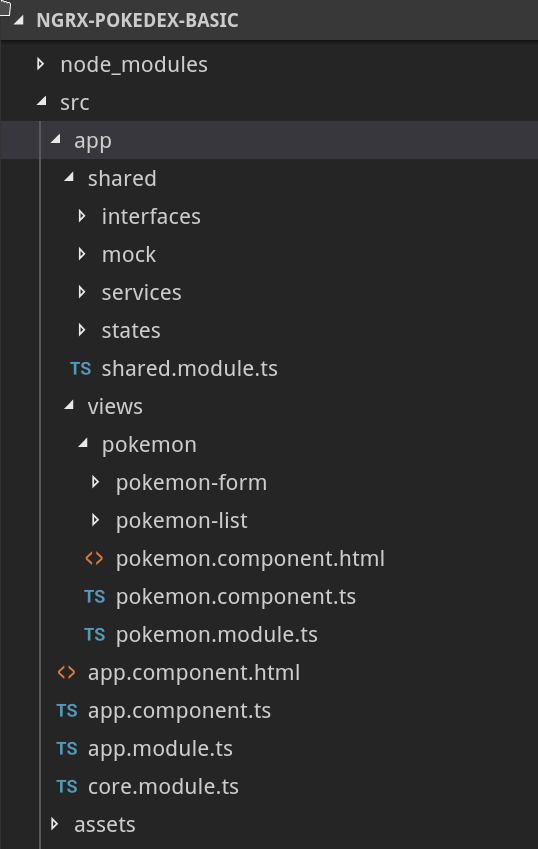
The structure of the application is divided into two clearly differentiated parts:
- shared. Here we will place all the elements that are shared among all the modules, such as pipes, directives, services, models and the state.
- state. The state is divided in turn into substates that allow us to manage the data structures where the state of the application will be stored. In our application we will only have a state called Pokemon where the information related to Pokemons is stored.
- views. Here you will find the views/pages of the application. The application is structured in modules:
- CoreModule. The services that are essential for the application, which need to be instantiated initially.
- SharedModule. The modules that are shared among all the feature modules.
- FeatureModules. Modules that are organized by features in the application. In our concrete application we will only have one feature module (PokemonModule).
Initial Configuration
The first step to make this tutorial is to create a new Angular project using the CLI. Then, the result of creating our project and the concrete version that is being used is shown.
ng new ngrx-pokedex
ng --version

     _                      _                 ____ _     ___
    / \   _ __   __ _ _   _| | __ _ _ __     / ___| |   |_ _|
   / △ \ | '_ \ / _` | | | | |/ _` | '__|   | |   | |    | |
  / ___ \| | | | (_| | |_| | | (_| | |      | |___| |___ | |
 /_/   \_\_| |_|\__, |\__,_|_|\__,_|_|       \____|_____|___|
                |___/


Angular CLI: 8.0.6
Node: 10.15.0
OS: linux x64
Angular: 8.0.3
... animations, common, compiler, compiler-cli, core, forms
... language-service, platform-browser, platform-browser-dynamic
... router

Package                           Version
-----------------------------------------------------------
@angular-devkit/architect         0.800.6
@angular-devkit/build-angular     0.800.6
@angular-devkit/build-optimizer   0.800.6
@angular-devkit/build-webpack     0.800.6
@angular-devkit/core              8.0.6
@angular-devkit/schematics        8.0.6
@angular/cli                      8.0.6
@ngtools/webpack                  8.0.6
@schematics/angular               8.0.6
@schematics/update                0.800.6
rxjs                              6.4.0
typescript                        3.4.5
webpack                           4.30.0
tsconfig.json && environments
In the projects I use TypeScript, I like configuring the path to access the subdirectories of shared without having to use several levels of backward indentation (../../ ..). The tsconfig.json file allows you to easily configure these aliases for the routes.
{
  "compileOnSave": false,
  "compilerOptions": {
    "baseUrl": "src",
    "outDir": "./dist/out-tsc",
    "sourceMap": true,
    "declaration": false,
    "downlevelIteration": true,
    "experimentalDecorators": true,
    "module": "esnext",
    "moduleResolution": "node",
    "importHelpers": true,
    "target": "es2015",
    "typeRoots": ["node_modules/@types"],
    "lib": ["es2018", "dom"],
    "resolveJsonModule": true,
    "paths": {
      "@shared/*": ["app/shared/*"],
      "@services/*": ["app/shared/services/*"],
      "@states/*": ["app/shared/states/*"],
      "@views/*": ["app/views/*"],
      "@models/*": ["app/shared/interfaces/*"],
      "@environments/*": ["environments/*"]
    }
  }
}
On the other hand, I consider configuring, as soon as possible, the environment variables in the development essential, to avoid having to carry out this task once it is decided to go from development to production. Therefore, the path to our developing fake-backend will be defined in the environment.ts file as shown below:
export const environment = {
  production: false,
  backendUrl: 'api/pokemons/'
};
Fake-backend
Instead of developing a backend where CRUD operations are performed on a database or memory, the in-memory-web-api module will be used. This allows us to emulate the operations over a REST.
This module intercepts Angular Http and HttpClient requests that would otherwise go to the remote server and redirects them to an in-memory data store that you control.
Create an InMemoryDataService class that implements InMemoryDbService.
At minimum, we must implement createDb method that creates a "database" hash whose keys are collection names and whose values are arrays of collection objects to return or update. Also, I've implemented the genId method that generate an unique ID for each new pokemon from fake-server.
npm i angular-in-memory-web-api
import { InMemoryDbService } from 'angular-in-memory-web-api';
import { pokemons as pokemonsDB } from '../mock/pokemons';

export class InMemoryDataService implements InMemoryDbService {
  createDb() {
    const pokemons = pokemonsDB;
    return { pokemons };
  }
  genId(): number {
    return Math.round(Math.random() * 1000000);
  }
}
The data coming from a mock file with the following structure:
export const pokemons = [
  {
    id: 1,
    photo: 1,
    name: 'bulbasaur',
    types: ['grass', 'poison'],
    height: 7,
    weight: 69,
    description:
      'For some time after its birth, it grows by gaining nourishment from the seed on its back.'
  },
  {
    id: 2,
    photo: 2,
    name: 'ivysaur',
    types: ['grass', 'poison'],
    height: 10,
    weight: 130,
    description:
      'When the bud on its back starts swelling, a sweet aroma wafts to indicate the flowers coming bloom.'
  },
  ...
 ];
Finally, a static image is stored in the server for each Pokemon. These images are stored in the assets/images/pokemon/ path using the photo field to identify it.
Register your data store service implementation with the HttpClientInMemoryWebApiModule in your root AppModule.imports calling the forRoot static method with this service class and an optional configuration object:
import { AppComponent } from './app.component';
import { BrowserModule } from '@angular/platform-browser';
import { HttpClientInMemoryWebApiModule } from 'angular-in-memory-web-api';
import { HttpClientModule } from '@angular/common/http';
import { InMemoryDataService } from './shared/services/in-memory-data.service';
import { NgModule } from '@angular/core';

@NgModule({
  declarations: [AppComponent],
  imports: [
    BrowserModule,
    HttpClientModule,
    HttpClientInMemoryWebApiModule.forRoot(InMemoryDataService)
  ],
  providers: [],
  bootstrap: [AppComponent]
})
export class AppModule {}
This in-memory web api service processes an HTTP request and returns an Observable of HTTP Response object in the manner of a RESTy web api. It natively handles URI patterns in the form :base/:collectionName/:id?
Examples:
// for requests to an api base URL that gets heroes from a 'heroes' collection
GET api/heroes // all heroes
GET api/heroes/42 // the hero with id=42
GET api/heroes?name=^j // 'j' is a regex; returns heroes whose name starting with 'j' or 'J'
GET api/heroes.json/42 // ignores the ".json"
The in-memory web api service processes these requests against a "database" - a set of named collections - that you define during setup.
NgRX Installation
@ngrx/store
Store is RxJS powered state management for Angular applications, inspired by Redux. Store is a controlled state container designed for helping to write high performing and consistent applications on top of Angular.
Key concepts:
- Actions describe unique events that are dispatched from components and services.
- State changes are handled by pure functions called reducers that take the current state and the latest action to compute a new state.
- Selectors are pure functions used to select, derive and compose pieces of state.
- State accessed with the store, an observable of state and an observer of actions.
You only need to install the following package:
npm install @ngrx/store
@ngrx/effects
Effects are an RxJS powered side effect model for Store. Effects use streams to provide new sources of actions to reduce state based on external interactions such as network requests, web socket messages and time-based events.
Introduction
In a service-based Angular application, components are responsible for interacting with external resources directly through services. Instead, effects provides a way to interact with those services and isolate them from the components. Effects is where you handle tasks, such as fetching data, long-running tasks that produce multiple events, and other external interactions where your components don't need explicit knowledge of these interactions.
Key Concepts
- Effects isolates side effects from components, allowing for purer components that select state and dispatch actions.
- Effects runs long-running services that listen to an observable of every action dispatched from the Store.
- Effects filters those actions based on the type of action they are interested in. This is done by using an operator.
- Effects performs tasks, which are synchronous or asynchronous and return a new action.
You only need to install the following package:
npm install @ngrx/effects
@ngrx/store-devtools
Store Devtools provides developer tools and instrumentation for Store.
The steps to configure the tool are the following ones:
- Install the package:
npm install @ngrx/store-devtools. - Install the Chrome/Firefox extension.
- In your
AppModuleadd instrumentation to the module imports usingStoreDevtoolsModule.instrument:
import { StoreDevtoolsModule } from '@ngrx/store-devtools';
import { environment } from '../environments/environment'; // Angular CLI environemnt

@NgModule({
  imports: [
    StoreModule.forRoot(reducers),
    // Instrumentation must be imported after importing StoreModule (config is optional)
    StoreDevtoolsModule.instrument({
      maxAge: 25, // Retains last 25 states
      logOnly: environment.production, // Restrict extension to log-only mode
    }),
  ],
})
export class AppModule {}
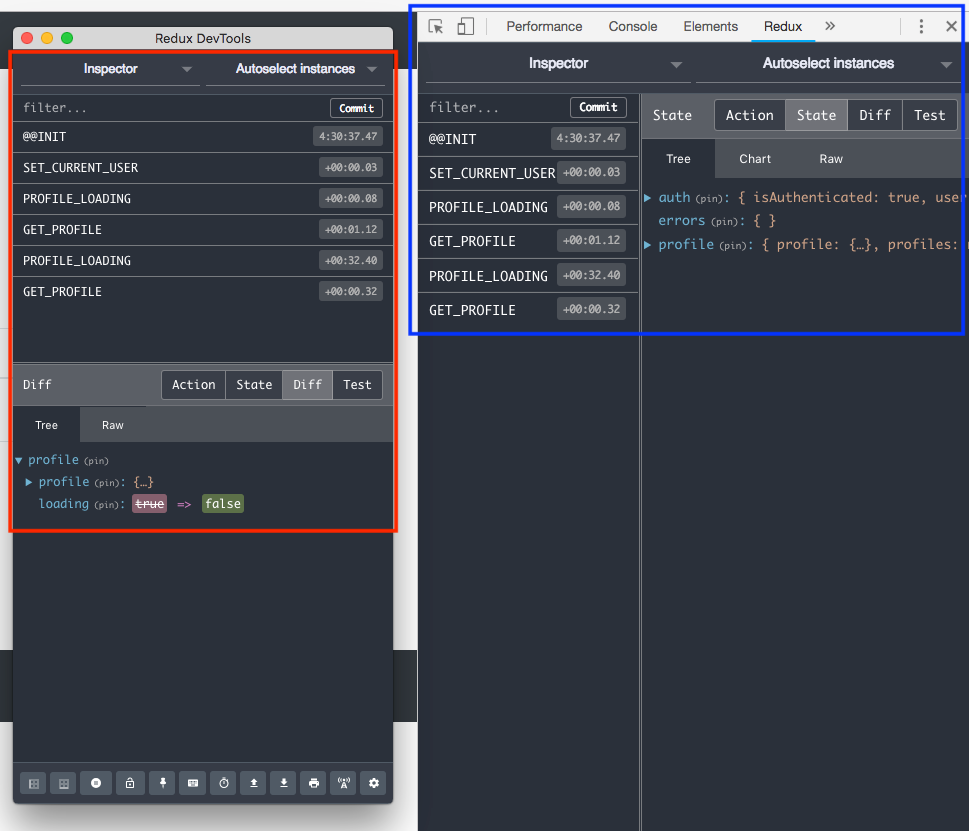
At the conclusion of these steps, you will obtain a new redux tab when you open the web browser element inspector. In this new tab, you can see the actions that have been triggered and the application's state.
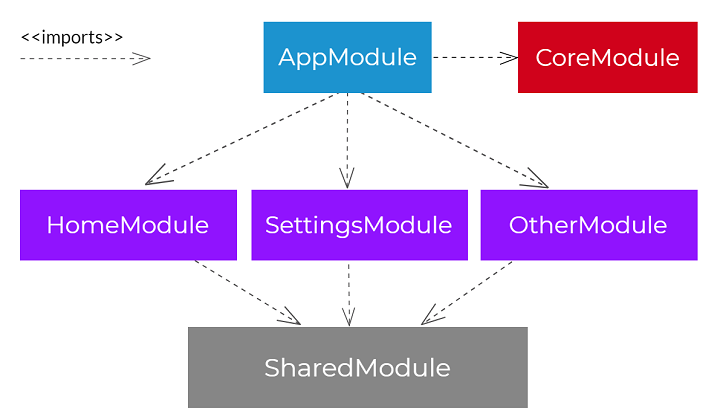
SharedModule & Core.module
Following the instructions of the Angular team to build an Angular application architecture, two modules will be defined:
- SharedModule. This module imports and exports the modules that are shared in the feature modules. Note that a set of modules belonging to
@angular/materialhave been imported, which could have been imported and exported in a specific module namedshared.material.module. However, it has been exported directly from theSharedModulemodule to simplify the problem. It is necessary to import theStoreModulemodule since it is the responsible to load the store in the application. Finally, modules related to the forms are imported in order to build the user interfaces. - CoreModule. In this module, the reducers and effects are initialized using the
StoreModuleandEffectsModulemodules.
import {
  MatButtonModule,
  MatCardModule,
  MatFormFieldModule,
  MatIconModule,
  MatInputModule,
  MatProgressSpinnerModule,
  MatSelectModule,
  MatSnackBarModule,
  MatToolbarModule
} from '@angular/material';

import { BrowserAnimationsModule } from '@angular/platform-browser/animations';
import { CommonModule } from '@angular/common';
import { FlexLayoutModule } from '@angular/flex-layout';
import { FormsModule } from '@angular/forms';
import { NgModule } from '@angular/core';
import { ReactiveFormsModule } from '@angular/forms';
import { StoreModule } from '@ngrx/store';

const MaterialModules = [
  MatInputModule,
  MatButtonModule,
  MatFormFieldModule,
  MatSelectModule,
  MatIconModule,
  MatCardModule,
  MatToolbarModule,
  MatSnackBarModule,
  MatProgressSpinnerModule
];
@NgModule({
  declarations: [],
  imports: [CommonModule, ReactiveFormsModule],
  exports: [
    CommonModule,
    FormsModule,
    ReactiveFormsModule,
    StoreModule,
    FlexLayoutModule,
    ...MaterialModules,
    BrowserAnimationsModule
  ]
})
export class SharedModule {}
import { CommonModule } from '@angular/common';
import { EffectsModule } from '@ngrx/effects';
import { HttpClientModule } from '@angular/common/http';
import { NgModule } from '@angular/core';
import { PokemonEffects } from '@states/pokemon/pokemon.effects';
import { PokemonService } from '@services/pokemon.service';
import { StoreModule } from '@ngrx/store';
import { reducers } from './shared/states/root.reducer';

@NgModule({
  declarations: [],
  imports: [
    CommonModule,
    HttpClientModule,
    StoreModule.forRoot(reducers),
    EffectsModule.forRoot([PokemonEffects])
  ],
  providers: [PokemonService],
  exports: []
})
export class CoreModule {}
Angular Material
Angular Material installation is quite simple since we only need to install the following packages:
npm install @angular/material
npm install @angular/flex-layout
npm install @angular/cdk
Pokemon Service
In case that we have to use a service with NGRX, we subtract all the logic related to the state of the application. Traditionally, when you develop a service in Angular, you have a set of attributes that model a sub-state of the application.
Using NGRX the problem is considerably reduced since all the logic related to the management of the state is delegated to the Store and therefore disappears from the services. In fact, our Pokemon.service service can be considered a larger service that encapsulates the logic related to the HttpClient service since its only task is to communicate with the backend.
import { HttpClient } from '@angular/common/http';
import { Injectable } from '@angular/core';
import { Observable } from 'rxjs';
import { Pokemon } from '@shared/interfaces/pokemon.interface';
import { environment } from '@environments/environment';

@Injectable({
  providedIn: 'root'
})
export class PokemonService {
  constructor(private http: HttpClient) {}

  public getAll(): Observable<Pokemon[]> {
    return this.http.get<Pokemon[]>(environment.backendUrl);
  }

  public delete(id: string): Observable<Pokemon> {
    return this.http.delete<Pokemon>(`${environment.backendUrl}/${id}`);
  }

  public add(pokemon: Pokemon): Observable<Pokemon> {
    return this.http.post<Pokemon>(environment.backendUrl, pokemon);
  }

  public update(pokemon: Partial<Pokemon>): Observable<Pokemon> {
    return this.http.put<Pokemon>(`${environment.backendUrl}`, pokemon);
  }
}
It is not necessary to build a class when you are not going to include methods related to the data. For that reason, we have decided to create an interface in which the attributes of each Pokemon are modeled as shown below.
export interface Pokemon {
  id: number;
  name: string;
  description: string;
  height: number;
  weight: number;
  photo: string;
}
NgRX
NgRx is a framework for building reactive applications in Angular. NgRx provides state management, isolation of side effects, entity collection management, router bindings, code generation, and developer tools that enhance developers experience when building many different types of applications.
NgRX is composed of the following concepts:
- State. Here is defined the
statethat we want to model, the ideal is to design sub-states that make up the full state. - Actions. List of actions that can be performed on the store or that have an effect.
- Reducers. Methods that transform the State (creating a new state since immutability is used).
- Selectors. Methods that allow to create an observable on a substate of the store. The selectors are very useful since they allow to create observables only on the fragment that interests us in each component, without needing to be observing the whole store.
- Effects.Those methods that do not modify the store are incorporated here. In our case, we will use it to create notifications whether the operations were carried out satisfactorily or incorrectly. An addition, the effects are used to trigger the actions in case the service's operations have been satisfactorily or incorrectly performed.
Therefore, the @shared/state/pokemon directory consists of the following files:
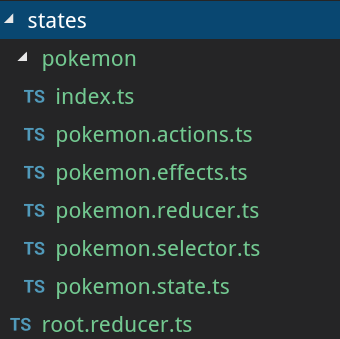
The index.ts file is only used to improve the verbosity of the imports in the pokemon directory.
export * from './pokemon.actions';
export * from './pokemon.state';
export * from './pokemon.effects';
export * from './pokemon.reducer';
export * from './pokemon.selector';
State Models
We now create a some state models in pokemon file.
@shared/interfaces/store.interface.ts
import { PokemonState } from '@shared/states/pokemon';

export interface AppStore {
  pokemon: PokemonState;
}
The pokemon state is composed of two attributes that we define below:
- ids. It is an array of numbers that contains the keys of the objects in a certain order. In this first post we will not use this array, which is provided by the
@ngrx/entitymodule that we will explain in the next post. - entities. It is a key-value object where the key is a string corresponding to the ID of each pokemon. In this way, we have a direct access to each pokemon through its key without having to search in arrays.
import { Pokemon } from '@shared/interfaces/pokemon.interface'
export interface PokemonState {
  ids: number[];
  entities: { [key: string]: Pokemon };
}
Actions
The first thing we must define is the set of actions that can be performed on the store.
The traditional operations are those composed by the well-known acronym CRUD. Each operation is complemented with two extra operations that are the operation XX_SUCCESS and XX_FAILED.
In this way, the operation without a suffix is used as a trigger for the execution of the service, which communicates with the backend.
Depending on the value returned by the service, the SUCCESS or FAILED action will be triggered.
In the event that the SUCCESS operation is triggered, the associated reducer that modifies the store and a notification with the message that the operation has been carried out satisfactorily will be executed. On the other hand, when the FAILED operation is executed we do not need to modify the store but a notification indicating that an error has occurred.
Therefore, the set of actions that we define, with their corresponding namespace [Pokemon] are the following:
export enum PokemonActionTypes {
  ADD = '[Pokemon] Add',
  ADD_SUCCESS = '[Pokemon] Add success',
  ADD_FAILED = '[Pokemon] Add failed',
  LOAD_POKEMONS = '[Pokemon] Load pokemon',
  LOAD_POKEMONS_SUCCESS = '[Pokemon] Load pokemon success',
  LOAD_POKEMONS_FAILED = '[Pokemon] Load pokemon failed',
  UPDATE = '[Pokemon] Update',
  UPDATE_SUCCESS = '[Pokemon] Update success',
  UPDATE_FAILED = '[Pokemon] Update failed',
  DELETE = '[Pokemon] Delete',
  DELETE_SUCCESS = '[Pokemon] Delete success',
  DELETE_FAILED = '[Pokemon] Delete failed'
}
A class that implements the Action interface is used to build each of the actions in the NgRX ecosystem. The payload is specified in the constructor method of each of the classes. This payload is the argument of the reducers, which modify the state.
The AddSuccess class is shown as an example. The type attribute is used to define the type of action to which that class corresponds. Finally, the payload associated to this action is aPokemon coming from the backend.
export class AddSuccess implements Action {
  readonly type = PokemonActionTypes.ADD_SUCCESS;

  constructor(public pokemon: Pokemon) {}
}
The pokemon.actions.ts file is the one shown below:
import { Action } from '@ngrx/store';
import { Pokemon } from '@models/pokemon.interface';

export enum PokemonActionTypes {
  ADD = '[Pokemon] Add',
  ADD_SUCCESS = '[Pokemon] Add success',
  ADD_FAILED = '[Pokemon] Add failed',
  LOAD_POKEMONS = '[Pokemon] Load pokemon',
  LOAD_POKEMONS_SUCCESS = '[Pokemon] Load pokemon success',
  LOAD_POKEMONS_FAILED = '[Pokemon] Load pokemon failed',
  UPDATE = '[Pokemon] Update',
  UPDATE_SUCCESS = '[Pokemon] Update success',
  UPDATE_FAILED = '[Pokemon] Update failed',
  DELETE = '[Pokemon] Delete',
  DELETE_SUCCESS = '[Pokemon] Delete success',
  DELETE_FAILED = '[Pokemon] Delete failed'
}

export class LoadPokemon implements Action {
  readonly type = PokemonActionTypes.LOAD_POKEMONS;

  constructor() {}
}

export class LoadPokemonSuccess implements Action {
  readonly type = PokemonActionTypes.LOAD_POKEMONS_SUCCESS;

  constructor(public payload: Array<Pokemon>) {}
}
export class LoadPokemonFailed implements Action {
  readonly type = PokemonActionTypes.LOAD_POKEMONS_FAILED;

  constructor(public message: string) {}
}

export class Add implements Action {
  readonly type = PokemonActionTypes.ADD;

  constructor(public pokemon: Pokemon) {}
}

export class AddSuccess implements Action {
  readonly type = PokemonActionTypes.ADD_SUCCESS;

  constructor(public pokemon: Pokemon) {}
}
export class AddFailed implements Action {
  readonly type = PokemonActionTypes.ADD_FAILED;

  constructor(public message: string) {}
}

export class Delete implements Action {
  readonly type = PokemonActionTypes.DELETE;

  constructor(public id: number) {}
}
export class DeleteSuccess implements Action {
  readonly type = PokemonActionTypes.DELETE_SUCCESS;

  constructor(public id: number) {}
}
export class DeleteFailed implements Action {
  readonly type = PokemonActionTypes.DELETE_FAILED;

  constructor(public message: string) {}
}

export class Update implements Action {
  readonly type = PokemonActionTypes.UPDATE;

  constructor(public pokemon: Pokemon) {}
}
export class UpdateSuccess implements Action {
  readonly type = PokemonActionTypes.UPDATE_SUCCESS;

  constructor(public pokemon: Pokemon) {}
}
export class UpdateFailed implements Action {
  readonly type = PokemonActionTypes.UPDATE_FAILED;

  constructor(public message: string) {}
}

export type PokemonActions =
  | LoadPokemonSuccess
  | Add
  | AddSuccess
  | AddFailed
  | Delete
  | DeleteSuccess
  | DeleteFailed
  | Update
  | UpdateSuccess
  | UpdateFailed;
Reducers
Reducers in NgRx are responsible for handling transitions from one state to the next state in your application. Reducers functions handle these transitions by determining which actions to handle based on the action's type.
In the NgRX ecosystem, it is only necessary to export a function to reduce to the CoreModule. In our concrete problem, this function is pokemonReducer. In the function reducer is where state changes are defined.
This function has got the following signature:
export function pokemonInitialState(): PokemonState {
  return {
    ids: [],
    entities: {}
  };
}

export function pokemonReducer(
  state: PokemonState = pokemonInitialState(),
  action: PokemonActions
): PokemonState
Where two parameters are received:
- state. The current state, prior to the modification. In case there is no current state, the initial state will be used, which has been defined in a function.
- action. The action that is going to be carried out on the state.
The reduce function consists of a switch in which a new PokemonState must be returned.
switch (action.type) {
    case PokemonActionTypes.LOAD_POKEMONS_SUCCESS:
      return {
        ...state,
        entities: arrayToObject(action.payload)
      };

    case PokemonActionTypes.ADD_SUCCESS:
      return {
        ...state,
        entities: {
          ...state.entities,
          [action.pokemon.id]: action.pokemon
        }
      };

    case PokemonActionTypes.DELETE_SUCCESS:
      const entities = { ...state.entities };
      delete entities[action.id];
      return {
        ...state,
        entities
      };

    case PokemonActionTypes.UPDATE_SUCCESS:
      return {
        ...state,
        entities: {
          ...state.entities,
          [action.pokemon.id]: action.pokemon
        }
      };

    default:
      return state;
  }
Note that the cases that modify the state are "SUCCESS" where the spread operator](https://developer.mozilla.org/en-US/docs/Web/JavaScript/Reference/Operators/Spread_syntax) is used to build the new state.
For example, the ADD_SUCCESS case returns a new object in which the current state (... state) and the modification of theentities property are combined. The entities property is a new object composed by the combination of the old state.entities in which the action.pokemon.id position is modified with the new action.pokemon.
It is very important to note that in the received payload object will be composed of a property called pokemon which is the object passed as a parameter from the created action.
case PokemonActionTypes.ADD_SUCCESS:
      return {
        ...state,
        entities: {
          ...state.entities,
          [action.pokemon.id]: action.pokemon
        }
      };
The pokemon.reducer.ts file is the one shown below. The arrayToObject function is an auxiliary function that converts an array into an object
import { PokemonActionTypes, PokemonActions } from './pokemon.actions';

import { PokemonState } from './pokemon.state';

export function pokemonInitialState(): PokemonState {
  return {
    ids: [],
    entities: {}
  };
}

function arrayToObject(array) {
  return array.reduce((obj, item) => {
    obj[item.id] = item;
    return obj;
  }, {});
}

export function pokemonReducer(
  state: PokemonState = pokemonInitialState(),
  action: PokemonActions
): PokemonState {
  switch (action.type) {
    case PokemonActionTypes.LOAD_POKEMONS_SUCCESS:
      return {
        ...state,
        entities: arrayToObject(action.payload)
      };

    case PokemonActionTypes.ADD_SUCCESS:
      return {
        ...state,
        entities: {
          ...state.entities,
          [action.pokemon.id]: action.pokemon
        }
      };

    case PokemonActionTypes.DELETE_SUCCESS:
      const entities = { ...state.entities };
      delete entities[action.id];
      return {
        ...state,
        entities
      };

    case PokemonActionTypes.UPDATE_SUCCESS:
      return {
        ...state,
        entities: {
          ...state.entities,
          [action.pokemon.id]: action.pokemon
        }
      };

    default:
      return state;
  }
}
Selectors
Selectors are pure functions used for obtaining slices of store state. @ngrx/store provides a few helper functions for optimizing this selection. Selectors provide many features when selecting slices of state.
- Portable
- Memoization
- Composition
- Testable
- Type-safe
NgRX provides two functions to create selectors:
- CreateFeatureSelector. This function allows us to create a selector for a substate.
- CreateSelector. This function allows us to create selectors using two parameters: 1. A selector; 2. A function that defines what value we want to select.
In our Pokédex we only need a selector (load them all), in case we have a page with details of each one of the pokemons we could create a specific selector called selectById.
The pokemon.selector.ts file is the one shown below.
import { createFeatureSelector, createSelector } from '@ngrx/store';

import { PokemonState } from './pokemon.state';

export const selectPokemonState = createFeatureSelector<PokemonState>(
  'pokemon'
);

export const selectAll = createSelector(
  selectPokemonState,
  state => Object.values(state.entities)
);
Effects
The effects are a fundamental part of our implementation of Pokédex since we have delegated the responsibility of deciding which action to dispatch for the purpose. Below, there are the effects associated with the loading of pokemons as examples to this explanation.
loadAllPokemon$ is listening for the appearance of the LOAD_POKEMONS action (which will be dispatched from the components). From this point on NgRX a minimum knowledge of the RxJS library is required because it will work with the observable streams
In the first place, the switchMap operator is used, which allows to discard the sequence of values coming from the issuer to only have a flow managed at each moment. This is where the PokemonService service is used which returns an Observable<Pokemon[]>from the backend. If the operation from the backend is successful, then the LoadPokemonSuccess action is triggered in which the payload is the pokemon array. On the other hand, if an error occurs from the backend, then the LoadPokemonFailed action is triggered in which the payload is the server error message.
  @Effect()
  loadAllPokemon$: Observable<any> = this.actions$.pipe(
    ofType(PokemonActions.PokemonActionTypes.LOAD_POKEMONS),
    switchMap(() =>
      this.pokemonService.getAll().pipe(
        map(pokemons => new PokemonActions.LoadPokemonSuccess(pokemons)),
        catchError(error => of(new PokemonActions.LoadPokemonFailed(error)))
      )
    )
  );
In our case, the problem has been simplified by creating two effects that listen to the SUCCESS and FAILED operations. In both effects, the same notification message is always displayed.
@Effect({ dispatch: false })
  successNotification$ = this.actions$.pipe(
    ofType(...this.POKEMON_ACTIONS_SUCCESS),
    tap(() =>
      this.snackBar.open('SUCCESS', 'Operation success', {
        duration: 2000
      })
    )
  );
  @Effect({ dispatch: false })
  failedNotification$ = this.actions$.pipe(
    ofType(...this.POKEMON_ACTIONS_FAILED),
    tap(() =>
      this.snackBar.open('FAILED', 'Operation failed', {
        duration: 2000
      })
    )
  );
It is important to note that the parameter dispatch: false has been indicated to the Effect decorator since each effect by default triggers an action; if it is not defined, it triggers the same action at the end, which can lead to an infinite loop.
Both effects listen for actions of a specific type (POKEMON_ACTIONS_SUCCESS orPOKEMON_ACTIONS_FAILED) and trigger a notification using Angular Material's snackBar service.
Do not wait for an effect for the SUCCESS action in which the store is modified, since that is precisely the task performed by the reducer that we have previously defined.
Finally, the pokemon.effects.ts file is the one shown below.
import * as PokemonActions from '@states/pokemon/pokemon.actions';

import { Actions, Effect, ofType } from '@ngrx/effects';
import { Observable, of } from 'rxjs';
import { catchError, map, switchMap, tap } from 'rxjs/operators';

import { Injectable } from '@angular/core';
import { MatSnackBar } from '@angular/material';
import { Pokemon } from '@shared/interfaces/pokemon.interface';
import { PokemonService } from '@services/pokemon.service';

@Injectable()
export class PokemonEffects {
  constructor(
    private actions$: Actions,
    private pokemonService: PokemonService,
    public snackBar: MatSnackBar
  ) {}

  POKEMON_ACTIONS_SUCCESS = [
    PokemonActions.PokemonActionTypes.ADD_SUCCESS,
    PokemonActions.PokemonActionTypes.UPDATE_SUCCESS,
    PokemonActions.PokemonActionTypes.DELETE_SUCCESS,
    PokemonActions.PokemonActionTypes.LOAD_POKEMONS_SUCCESS
  ];

  POKEMON_ACTIONS_FAILED = [
    PokemonActions.PokemonActionTypes.ADD_FAILED,
    PokemonActions.PokemonActionTypes.UPDATE_FAILED,
    PokemonActions.PokemonActionTypes.DELETE_FAILED,
    PokemonActions.PokemonActionTypes.LOAD_POKEMONS_FAILED
  ];

  @Effect()
  loadAllPokemon$: Observable<any> = this.actions$.pipe(
    ofType(PokemonActions.PokemonActionTypes.LOAD_POKEMONS),
    switchMap(() =>
      this.pokemonService.getAll().pipe(
        map(pokemons => new PokemonActions.LoadPokemonSuccess(pokemons)),
        catchError(error => of(new PokemonActions.LoadPokemonFailed(error)))
      )
    )
  );

  @Effect()
  addPokemon$: Observable<any> = this.actions$.pipe(
    ofType(PokemonActions.PokemonActionTypes.ADD),
    switchMap((action: any) =>
      this.pokemonService.add(action.pokemon).pipe(
        map((pokemon: Pokemon) => new PokemonActions.AddSuccess(pokemon)),
        catchError(error => of(new PokemonActions.AddFailed(error)))
      )
    )
  );

  @Effect()
  deletePokemon$: Observable<any> = this.actions$.pipe(
    ofType(PokemonActions.PokemonActionTypes.DELETE),
    switchMap(({ id }) =>
      this.pokemonService.delete(id).pipe(
        map(() => new PokemonActions.DeleteSuccess(id)),
        catchError(error => of(new PokemonActions.DeleteFailed(error)))
      )
    )
  );

  @Effect()
  updatePokemon$: Observable<any> = this.actions$.pipe(
    ofType(PokemonActions.PokemonActionTypes.UPDATE),
    switchMap(({ pokemon }) =>
      this.pokemonService.update(pokemon).pipe(
        map(() => new PokemonActions.UpdateSuccess(pokemon)),
        catchError(error => of(new PokemonActions.UpdateFailed(error)))
      )
    )
  );

  @Effect({ dispatch: false })
  successNotification$ = this.actions$.pipe(
    ofType(...this.POKEMON_ACTIONS_SUCCESS),
    tap(() =>
      this.snackBar.open('SUCCESS', 'Operation success', {
        duration: 2000
      })
    )
  );
  @Effect({ dispatch: false })
  failedNotification$ = this.actions$.pipe(
    ofType(...this.POKEMON_ACTIONS_FAILED),
    tap(() =>
      this.snackBar.open('FAILED', 'Operation failed', {
        duration: 2000
      })
    )
  );
}
Root.reducer
Finally, and not least, we need a root.reducer file from which all the sub-states of our application will be loaded. In our particular case, we only have pokemon.reducer.
import { pokemonReducer } from './pokemon/pokemon.reducer';

export const reducers = { pokemon: pokemonReducer };
Pages/Views
Now, we will begin to build the visual part of our application. Keeping in mind that all the management of the state of the application is delegated to NgRX and therefore, we do not need to worry about changing the state in any component.
This fact simplifies us a lot the pages/views since we will only have to define two types of components:
- SmartComponents. Components that will perform tasks with the store through the
dispatchmethod or using the selectors. - DummyComponents. Components that only have to show data and manage events towards the SmartComponent.
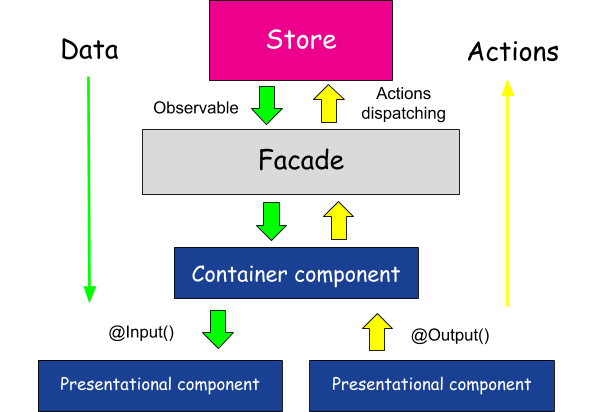
This architecture was presented in the ng-conf as a stable architecture. The following image shows the architecture used in which we have omitted the Facade pattern because it is not necessary for our concrete problem because we only have one module.
The structure of the views directories is as follows:
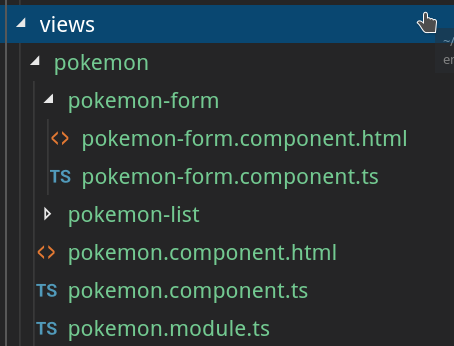
Returning to our concrete problem (Pokédex), PokemonComponent is the smart component, on the other hand the components related to the list and the form are dummies components.
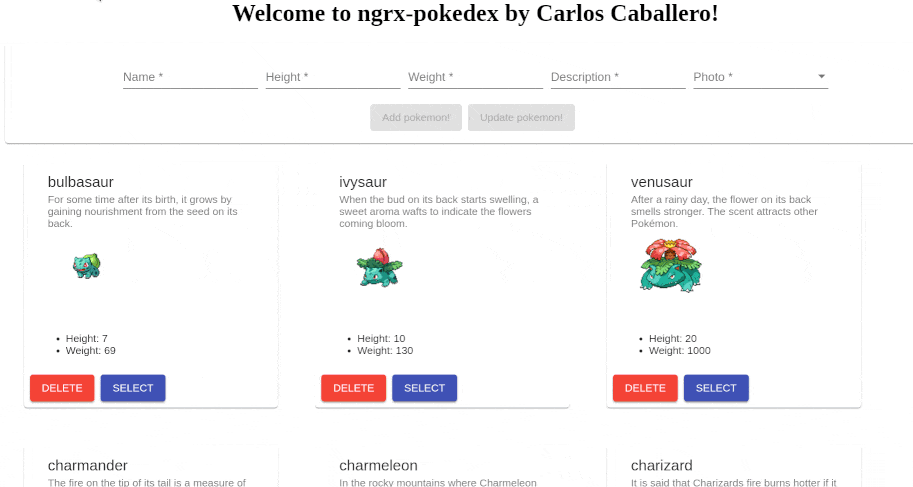
The launcher of our Pokemon module is the own app.component which is quite simple as I show you next.
<div style="text-align:center">
  <h1>Welcome to ngrx-pokedex by Carlos Caballero!</h1>
</div>
<app-pokemon></app-pokemon>
PokemonModule
The Pokemon Module is only responsible for loading the three components for which the application is composed, and of course, the SharedModule as shown below.
import { CommonModule } from '@angular/common';
import { NgModule } from '@angular/core';
import { PokemonComponent } from './pokemon.component';
import { PokemonFormComponent } from './pokemon-form/pokemon-form.component';
import { PokemonListComponent } from './pokemon-list/pokemon-list.component';
import { SharedModule } from '@shared/shared.module';

const COMPONENTS = [
  PokemonListComponent,
  PokemonComponent,
  PokemonFormComponent
];

@NgModule({
  declarations: COMPONENTS,
  imports: [CommonModule, SharedModule],
  exports: COMPONENTS
})
export class PokemonModule {}
Pokemon Component (Smart Component)
The Pokemon component interacts with the state through the dispatch method and the selectors. Communication with the component dummies is done through the attributes [pokemon] and the events' onUpdate, onAdd,onDelete and onSelect.
<app-pokemon-form
  [pokemon]="pokemon"
  (update)="onUpdate($event)"
  (add)="onAdd($event)"
></app-pokemon-form>
<app-pokemon-list
  [pokemons]="pokemons$ | async"
  (delete)="onDelete($event)"
  (select)="onSelect($event)"
></app-pokemon-list>
The app-pokemon-list component receives a list of pokemons which are constantly subscribed to the store through the selectAll selector. The pipe async is the one that performs the task of subscribe and unsubscribe the pokemons so that the component dummy receives the list of pokemons and only focuses on performing the task of displaying them properly.
The constructor of this component is responsible for loading all the pokemons using the LoadPokemon action as shown in the code:
constructor(private store$: Store<AppStore>) {
  this.store$.dispatch(new PokemonActions.LoadPokemon());
}
CRUD operations are performed in methods that are very simple:
public onDelete(pokemon: Pokemon) {
  this.store$.dispatch(new PokemonActions.Delete(pokemon.id));
}
public onSelect(pokemon: Pokemon) {
  this.pokemon = pokemon;
}
public onUpdate(pokemon: Pokemon) {
  this.store$.dispatch(new PokemonActions.Update(pokemon));
}
public onAdd(pokemon: Pokemon) {
  this.store$.dispatch(new PokemonActions.Add(pokemon));
}
The code of this component is the following:
import * as PokemonActions from '@states/pokemon/pokemon.actions';
import * as PokemonSelectors from '@states/pokemon/pokemon.selector';

import { ChangeDetectionStrategy, Component } from '@angular/core';

import { AppStore } from '@shared/interfaces/store.interface';
import { Observable } from 'rxjs';
import { Pokemon } from '@shared/interfaces/pokemon.interface';
import { Store } from '@ngrx/store';

@Component({
  selector: 'app-pokemon',
  templateUrl: './pokemon.component.html',
  changeDetection: ChangeDetectionStrategy.OnPush
})
export class PokemonComponent {
  public pokemon: Pokemon = {} as Pokemon;
  public pokemons$: Observable<any> = this.store$.select(
    PokemonSelectors.selectAll
  );
  public onDelete(pokemon: Pokemon) {
    this.store$.dispatch(new PokemonActions.Delete(pokemon.id));
  }
  public onSelect(pokemon: Pokemon) {
    this.pokemon = pokemon;
  }

  public onUpdate(pokemon: Pokemon) {
    this.store$.dispatch(new PokemonActions.Update(pokemon));
  }
  public onAdd(pokemon: Pokemon) {
    this.store$.dispatch(new PokemonActions.Add(pokemon));
  }
  constructor(private store$: Store<AppStore>) {
    this.store$.dispatch(new PokemonActions.LoadPokemon());
  }
}
PokemonForm Component (Add/Update Pokemons)
The PokemonForm component focuses on performing the operations add andupdate.
<mat-card class="container">
  <form [formGroup]="pokemonForm">
    <div
      class="form-element"
      fxLayout
      fxLayout.xs="column"
      fxLayoutAlign="center"
      fxLayoutGap="10px"
    >
      <mat-form-field>
        <mat-label>Name</mat-label>
        <input
          required
          formControlName="name"
          class="form-control"
          placeholder="Pikachu"
          type="text"
          matInput
        />
      </mat-form-field>
      <mat-form-field>
        <mat-label>Height</mat-label>
        <input
          matInput
          required
          formControlName="height"
          class="form-control"
          placeholder="0.5"
          type="text"
        />
      </mat-form-field>

      <mat-form-field>
        <mat-label>Weight</mat-label>
        <input
          matInput
          required
          formControlName="weight"
          class="form-control"
          placeholder="9.5"
          type="text"
        />
      </mat-form-field>
      <mat-form-field>
        <mat-label>Description</mat-label>
        <input
          matInput
          required
          formControlName="description"
          class="form-control"
          placeholder="Description"
          type="text"
        />
      </mat-form-field>
      <mat-form-field>
        <mat-label>Photo</mat-label>
        <mat-select required formControlName="photo" class="form-control">
          <mat-option *ngFor="let photo of photos" [value]="photo.id">{{
            photo.name
          }}</mat-option>
        </mat-select>
      </mat-form-field>
    </div>
    <div class="example-button-row">
      <button
        type="button"
        mat-raised-button
        color="primary"
        (click)="addPokemon()"
        [disabled]="!pokemonForm.valid"
      >
        Add pokemon!
      </button>
      <button
        type="button"
        mat-raised-button
        color="accent"
        (click)="updatePokemon()"
        [disabled]="!pokemonForm.valid"
      >
        Update pokemon!
      </button>
    </div>
  </form>
</mat-card>
This component only needs to focus on what is relevant to the view: Form Validation.
The communication between components is done using EventEmitter. On the other hand, this component receives a Pokemon from the smartComponent because you can select a pokemon to be edited from the PokemonList.
import {
  ChangeDetectionStrategy,
  Component,
  EventEmitter,
  Input,
  OnChanges,
  OnInit,
  Output
} from '@angular/core';
import { FormBuilder, FormGroup, Validators } from '@angular/forms';

import { Pokemon } from '@shared/interfaces/pokemon.interface';

@Component({
  selector: 'app-pokemon-form',
  templateUrl: './pokemon-form.component.html',
  changeDetection: ChangeDetectionStrategy.OnPush
})
export class PokemonFormComponent implements OnInit, OnChanges {
  pokemonForm: FormGroup;
  @Input() pokemon: Pokemon = {} as Pokemon;
  @Output() add: EventEmitter<Pokemon> = new EventEmitter<Pokemon>();
  @Output() update: EventEmitter<Pokemon> = new EventEmitter<Pokemon>();

  photos = [
    {
      id: 1,
      name: 'bulbasaur'
    },
    {
      id: 2,
      name: 'ivysaur'
    },
   ...
  ];
  constructor(private formBuilder: FormBuilder) {}

  ngOnInit() {
    this.initForm(this.pokemon);
  }
  ngOnChanges() {
    this.initForm(this.pokemon);
  }

  private initForm(pokemon: Partial<Pokemon> = {}) {
    this.pokemonForm = this.formBuilder.group({
      name: [pokemon.name, Validators.required],
      description: [pokemon.description, Validators.required],
      height: [pokemon.height, Validators.required],
      weight: [pokemon.weight, Validators.required],
      photo: [pokemon.photo, Validators.required]
    });
  }

  public addPokemon() {
    const pokemon: Pokemon = { ...this.pokemonForm.value };
    this.add.emit(pokemon);
    this.initForm();
  }

  public updatePokemon() {
    const pokemon = {
      ...this.pokemon,
      ...this.pokemonForm.value
    };
    this.update.emit(pokemon);
    this.initForm();
  }
}
PokemonList Component (Delete/Select Pokemons)
Finally, the PokemonList component has the task of communicating to the smartComponent to do the delete andselect operations. This component is very similar to the previous one. In this case we should only focus on showing the list of pokemons without having to worry about the application's state.
<div fxLayout="row wrap">
  <div
    *ngFor="let pokemon of pokemons; trackBy: trackByFn"
    fxFlex="27%"
    class="pokemon"
  >
    <mat-card class="example-card">
      <mat-card-header>
        <mat-card-title> {{ pokemon.name }}</mat-card-title>
        <mat-card-subtitle> {{ pokemon.description }} </mat-card-subtitle>
      </mat-card-header>

      <mat-card-content>
        <img
          mat-card-image
          src="assets/images/pokemon/{{ pokemon.photo }}.png"
        />
        <ul>
          <li>Height: {{ pokemon.height }}</li>
          <li>Weight: {{ pokemon.weight }}</li>
        </ul>
      </mat-card-content>
      <mat-card-actions>
        <button mat-raised-button color="warn" (click)="deletePokemon(pokemon)">
          DELETE
        </button>
        <button
          mat-raised-button
          color="primary"
          (click)="selectPokemon(pokemon)"
        >
          SELECT
        </button>
      </mat-card-actions>
    </mat-card>
  </div>
</div>
import {
  ChangeDetectionStrategy,
  Component,
  EventEmitter,
  Input,
  Output
} from '@angular/core';

import { Pokemon } from '@shared/interfaces/pokemon.interface';

@Component({
  selector: 'app-pokemon-list',
  templateUrl: './pokemon-list.component.html',
  styleUrls: ['./pokemon-list.component.css'],
  changeDetection: ChangeDetectionStrategy.OnPush
})
export class PokemonListComponent {
  @Input() pokemons: any[] = [];
  @Output() delete: EventEmitter<any> = new EventEmitter();
  @Output() select: EventEmitter<any> = new EventEmitter();

  constructor() {}

  public deletePokemon(pokemon: Pokemon) {
    this.delete.emit(pokemon);
  }
  public selectPokemon(pokemon: Pokemon) {
    this.select.emit(pokemon);
  }

  trackByFn(_, item) {
    return item.id;
  }
}
Offtopic: Styles
Finally, we have designed this application using Flex-Layout and Angular Material using the Indigo-pink theme which is configured from Angular's styles.css file.
@import '@angular/material/prebuilt-themes/indigo-pink.css';

.example-button-row button,
.example-button-row a {
  text-align: center;
  margin-right: 8px;
}
Conclusions
In this post, we have built a small example in which fundamental points of the architecture of a large SPA application are presented:
- Decouple the management of the state of the visual components.
- Create the elements for the management of the state efficiently and easily.
- Create components that focus on the relevant: The view.
- The components are classified in SmartComponent and DummyComponent according to whether they will communicate with the state of the application.
The following posts in this series will cover interesting topics such as:
- Automate the creation of the state since it is very repetitive using @ngrx/entity.
- Facade pattern will be used through the
@ngrx/datapackage. - Testing the application's state.
The important really are the concepts and not the technique or library used. Therefore, this post should be taken as a guide for those who start to have large Angular applications and require applying architectural principles.
More, More and More...
- Angular Architecture Best Practices
- Angular Architecture - ng-conf
- Angular Architecture (official docs)
- NGRX
- Understanding Memoization
- RxJS
- Facade Pattern
The GitHub branch of this post is https://github.com/Caballerog/ngrx-pokedex/tree/ngrx-part1