Understanding the Mediator Design Pattern
• • 17 min readThere are 23 classic design patterns described in the original book Design Patterns: Elements of Reusable Object-Oriented Software. These patterns provide solutions to particular problems often repeated in software development.
In this article, I am going to describe how the Mediator pattern works and when it should be applied.
Mediator: Basic idea
First, let’s see the definition provided by the Gang of Four book:
Define an object that encapsulates how a set of objects interact. The mediator pattern promotes loose coupling by keeping objects from referring to each other explicitly, and it lets you vary their interaction independently.
Next, let’s take a look at the UML class diagram for this pattern to understand each of its elements.
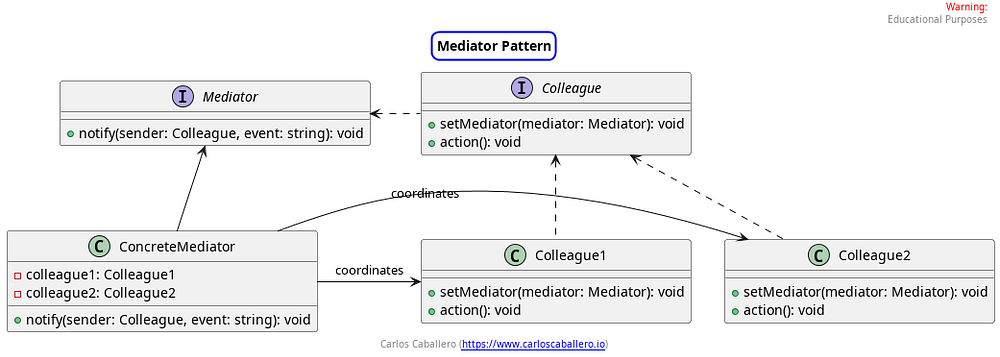
The Mediator pattern typically includes the following main elements:
- Mediator: Defines the interface for communication with
Colleagueobjects. - Concrete Mediator: Implements the
Mediatorinterface and coordinates communication betweenColleagueobjects. - Colleague: Defines the interface for communication with other colleagues through the mediator.
- Concrete Colleague: Implements the
Colleagueinterface and communicates its needs to the mediator, reacting to messages from the mediator.
Mediator Pattern: When to Use It
The Mediator pattern is a good solution when we find ourselves with a system in which a set of objects communicate in a complex and direct way with each other, resulting in high coupling between them. Here are some common situations where using the Mediator pattern can be beneficial:
1. Complex communication between multiple objects: As we have said, when we have several objects that need to communicate with each other in a complex and direct way, this can be difficult to understand and maintain. The Mediator pattern centralizes this complex communication into a single object, thus simplifying the communication flow and reducing coupling between objects.
2. Reducing coupling: If you want to reduce coupling between the components of your system, the Mediator pattern can help. By centralizing communication between objects through a mediator, direct dependencies between objects are eliminated, making it easier to modify and maintain code.
3. Facilitating component reusability: The Mediator pattern promotes the reusability of individual components by decoupling them from their interactions with other components. This allows objects to be more independent and therefore easier to reuse in different contexts or systems.
In summary, the Mediator pattern is useful in situations where it is necessary to reduce coupling between objects, simplify communication between them, and facilitate the maintenance and evolution of code in complex systems.
Let’s now move on to see examples of how to apply this pattern.
Mediator Pattern: Examples
In this section, we will illustrate the Mediator pattern with two examples:
- Basic Structure of the Mediator Pattern: In this example, we will translate the theoretical UML diagram into TypeScript code to identify each of the classes involved in the pattern.
- IoT Device Control System: In an Internet of Things (IoT) system where devices communicate directly with each other to coordinate their actions. If each device depends directly on other devices for communication, the system can become difficult to scale and maintain.
Example 1: Basic Structure of the Mediator Pattern
As always, the starting point is the UML class diagram. This UML class diagram is the same as the one we explained at the beginning of the post, and to lighten the post we will not explain it again as such. But we will start to see its implementation step by step.
Let’s start with the Mediator interface. This interface defines the contract that any mediator in the system must follow. In this case, it only has one method that we have called notify which receives the event sender (sender) and the event itself (event). This method is implemented by concrete mediators to handle communication between colleagues.
import { Colleague } from "./colleague";

export interface Mediator {
    notify(sender: Colleague, event: string): void;
}
The next class is the concrete mediator. This class implements the Mediator interface. It has references to the colleagues with which it will interact. In the notify method, the mediator receives an event from a colleague and decides how to handle it based on the sender. In our case, the solution has been modeled using a switch control structure in which, depending on the colleague, we invoke a request handler. In this example, we only display messages on the screen to know that the notification has arrived correctly.
import { Colleague } from "./colleague";
import { Colleague1 } from "./colleague1";
import { Colleague2 } from "./colleague2";
import { Mediator } from "./mediator";

export class ConcreteMediator implements Mediator {
    private colleague1: Colleague1;
    private colleague2: Colleague2;


    constructor(colleague1: Colleague1, colleague2: Colleague2) {
      this.colleague1 = colleague1;
      this.colleague2 = colleague2;
    }

    notify(sender: Colleague, event: string): void {
        switch(sender){
            case this.colleague1: this.handleColleague1(event); break;
            case this.colleague2: this.handleColleague2(event); break;
            default: console.log("Unknown sender");
        }

    }
    private handleColleague1(event){
        console.log("Event received by ConcreteMediator from Colleague1: ", event);
        console.log("implements colleague1 logic");
        console.log("-----------------");
    }

    private handleColleague2(event){
        console.log("Event received by ConcreteMediator from Colleague1: ", event);
        console.log("implements colleague1 logic");
        console.log("-----------------");
    }
}
The next thing would be to define the colleague interface, which is the contract that all colleagues in the system must follow. In this case, they have two methods: setMediator, to set the mediator they belong to, and action, to perform an action that can generate an event.
import { Mediator } from "./mediator";

export interface Colleague {
    setMediator(mediator: Mediator): void;
    action(): void;
}
What remains to be seen of the Mediator pattern would be the colleagues that implement this interface. In this case, they receive the mediator dependency through the constructor, and it is stored in a private attribute of the mediator type. This reference is very useful for communicating with the mediator when an event occurs, this is done in the action method, where we can see how it is being notified that an action has been performed that we want to be managed by the mediator through the notify method. This method is sent as a parameter the class itself that sends the request and the message or parameter that we want to be managed from the mediator.
import { Colleague } from "./colleague";
import { Mediator } from "./mediator";

export class Colleague1 implements Colleague {
    private mediator: Mediator;

    setMediator(mediator: Mediator): void {
      this.mediator = mediator;
    }

    action(): void {
      this.mediator.notify(this, "Event from Colleague1");
    }
}

export class Colleague2 implements Colleague {
    private mediator: Mediator;

    setMediator(mediator: Mediator): void {
      this.mediator = mediator;
    }

    action(): void {
      this.mediator.notify(this, "Event from Colleague2");
    }
}
At this point, we can think that the mediator pattern could use another pattern to communicate both to colleagues and to the mediator in a more reactive way, and this would be using the Observer pattern, which we have already talked about in other articles and you can read here. We leave you as a task, once you have internalized the mediator pattern, how to apply the observer pattern together with it.
To conclude, we would have to see how this pattern is used from the client class.
import { Colleague1 } from "./colleague1";
import { Colleague2 } from "./colleague2";
import { ConcreteMediator } from "./concrete-mediator";

const colleague1 = new Colleague1();
const colleague2 = new Colleague2();

const mediator = new ConcreteMediator(colleague1, colleague2);

colleague1.setMediator(mediator);
colleague2.setMediator(mediator);

colleague1.action();
colleague2.action();
In this class, the colleagues that interact with each other are instantiated. We relate the colleagues through the mediator, which is the one that will perform the mediation tasks between them.
On the other hand, we pass the mediator as a parameter to each colleague so that communication between the colleagues and the mediator can be achieved, that is, that the colleagues notify or warn that an event has occurred to the mediator.
And finally, each colleague will independently execute its action, which will be notified to the mediator and it will perform the different mediation tasks.
In this way we have decoupled the different colleagues from knowing each other, allowing new colleagues to be created without the need to know each other.
Now let’s move on to a different example, where we will start by seeing the lack of use of this pattern and then the solution with the pattern.
Example 2: IoT Device Control System without Mediator Pattern
In this example, we will create an IoT device control system where devices communicate directly with each other to coordinate their actions. Without the Mediator pattern, the code could be very coupled since devices communicate directly with each other.
If we look at the UML class diagram, we first find the abstract class IoTDevice that defines the methods that all IoT devices must have. In our case, all devices will have an attribute that corresponds to the id, and then methods to communicate with other devices such as sending and receiving messages. On the other hand, we see that the classes that extend this abstract class implement the methods that are defined for both sensors and actuators. However, to have some difference, we have included the receiveControlSignal method in the Actuator class as an extension of it.
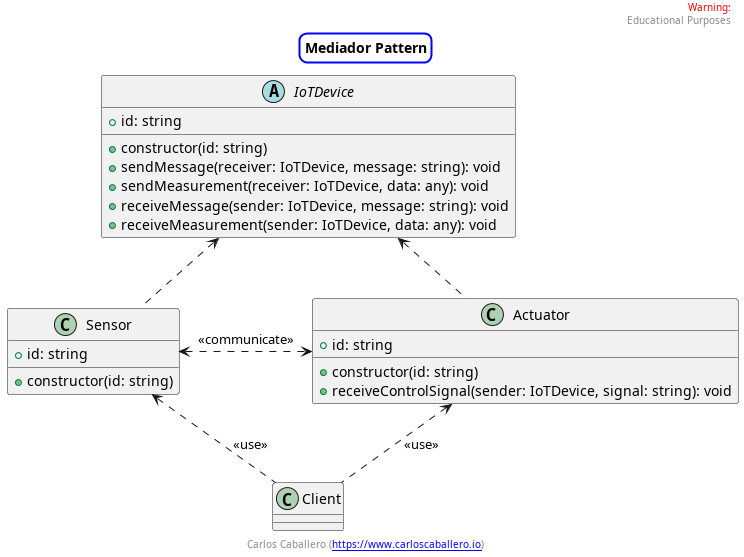
It is important to note that devices communicate with other devices through the arguments of the methods they implement, which is where the reference to the colleagues they want to interact with is being sent.
Finally, we will have the application client class that will make use of all the devices with which it wants to interact.
Let’s see the implementation of this first solution that does NOT use the Mediator pattern.
The first step is to define the abstract class IoTDevice. This class defines the common methods for all devices, the sendMessage and receiveMessage methods that simply display the information they receive on the screen. Right here, we could have a very different logic but we have simplified it to show how the devices communicate with each other. On the other hand, the sendMeasurement method has some logic in that it can only operate if the receiver is an Actuator, and the specific business logic is implemented there.
abstract class IoTDevice {
    constructor(public id: string) {}

    // Method to send a message to another device
    sendMessage(receiver: IoTDevice, message: string): void {
      console.log(`[${this.id}] Sending message to ${receiver.id}: ${message}`);
      // Logic to send the message to the receiver
      receiver.receiveMessage(this, message);
    }

    // Method to receive a message from another device
    receiveMessage(sender: IoTDevice, message: string): void {
      console.log(`[${this.id}] Message received from ${sender.id}: ${message}`);
      // Logic to process the received message
    }

    // Method to send measurement data to another device
    sendMeasurement(receiver: IoTDevice, data: any): void {
      console.log(`[${this.id}] Sending measurement data to ${receiver.id}: ${JSON.stringify(data)}`);
      // Logic to send the data to the receiver
      if (!(receiver instanceof Actuator)) {
        return console.log("Error: Measurement data can only be sent to an Actuator.");
      }
      receiver.receiveMeasurement(this, data);
    }


    // Method to receive measurement data from a sensor
    receiveMeasurement(sender: IoTDevice, data: any): void {
      console.log(`[${this.id}] Measurement data received from ${sender.id}: ${JSON.stringify(data)}`);
      // Logic to process the received measurement data
    }
}
The concrete classes that extend the abstract class would be the colleagues of the pattern. Specifically, we would have two types of devices: sensors and actuators.
export class Sensor extends IoTDevice {
    constructor(id: string) {
      super(id);
    }
}

export class Actuator extends IoTDevice {
    constructor(id: string) {
      super(id);
    }
    // Method to receive a control signal from another device
    receiveControlSignal(sender: IoTDevice, signal: string): void {
       console.log(`[${this.id}] Receiving control signal from ${sender.id}: ${signal}`);
       // Logic to process the received control signal
   }
}
We can see how these classes extend the abstract class. On the one hand, the Sensor class, which does not have any extra particularity and therefore is still without extended methods, and on the other hand the Actuator class, which has its own method, which we implement in its concrete class.
Finally, we would have to see the code of the client that makes use of all these classes. The first thing we have to do is create all the devices. To do this, we create two sensors and one actuator. These are our colleagues who want to interact with each other.
const sensor1 = new Sensor("Sensor1");
const sensor2 = new Sensor("Sensor2");
const actuator1 = new Actuator("Actuator1");

// Example interaction between devices
sensor1.sendMessage(sensor2, "How are you?");
sensor2.sendMeasurement(actuator1, { temperature: 25, humidity: 60 });
actuator1.receiveControlSignal(sensor2, "Turn off");
And then we see the communication between them, how first sensor1 has to send sensor2 as an argument to send it a message. On the other hand, sensor2s has to send actuator1a and the configuration parameters as arguments so that it receives them.
Finally, the actuator has to send sensor2 and the information as arguments. Here, the coupling between the different colleagues is clearly visible, since they are going to talk to each other directly from their implementations, in this case in the IoTDevice abstract class, which is the one that manages all the work to be done.
Let’s move on to decoupling this code right now.
Example 2: IoT Device Control System Using Mediator Pattern
The problems that appear in the solution without the Mediator pattern are the following:
- High Cohesion: The communication logic is coupled between objects and any change in the logic affects different classes.
- Scalability and maintainability: Adding new objects implies modifying other classes to fit. In addition, there is greater difficulty in understanding and modifying the communication flow between objects.
- Tight coupling: There is a strong dependency between the objects involved in the communication, which makes it difficult to modify or reuse them independently.
Therefore, in this example, we clearly see the need for the Mediator pattern, where we could include an element that would be the connection point between the different colleagues.
Let’s start by seeing how the UML class diagram evolves.
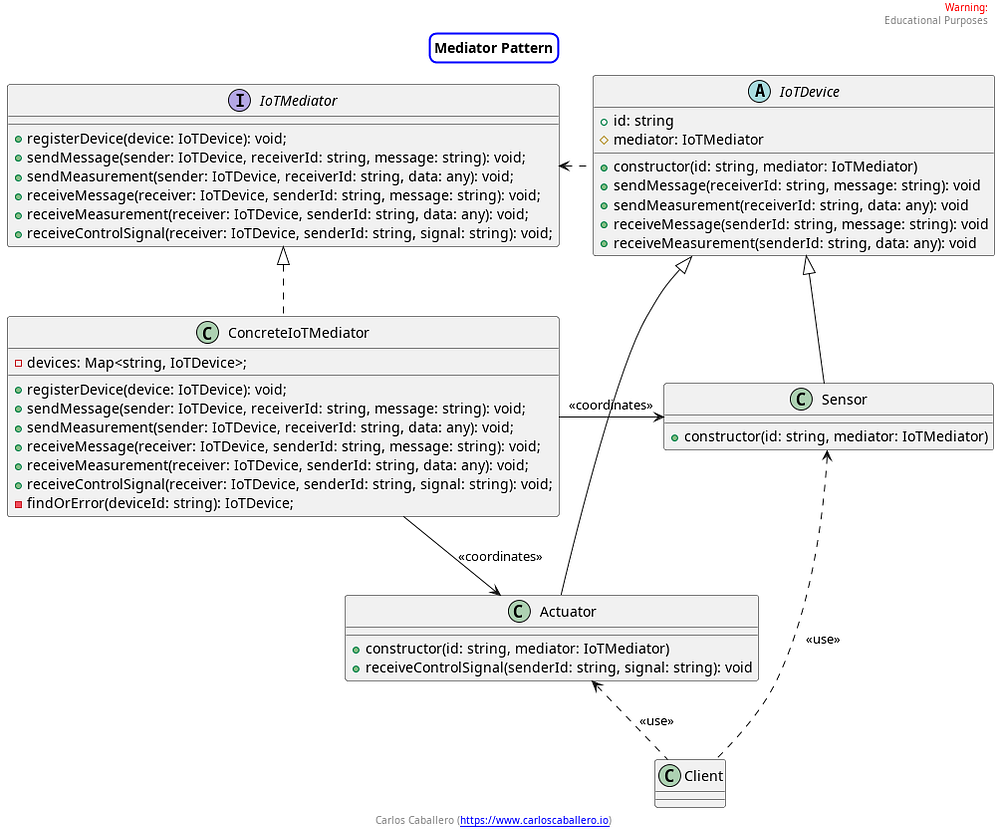
We start by seeing that the abstract class has not changed in the definition of the methods that are defined in it a priori. But there is a very important change, now the devices do not communicate with other devices, but rather a request is made about which device you want to communicate with, this parameter could be a unique identifier to find it, in our case to simplify we are going to use a string to define the device id.
This subtle but very important change. In addition, we now find that we will have an attribute called mediator which will be responsible for performing the tasks where the devices interact with each other. Finally, the definition of the Sensor and Actuator classes now we have to reference this mediator attribute through the constructor of the classes. We could have assigned the mediator through the constructor or with a setMediator accessor method, that is already up to the developer.
On the other hand of the class diagram we can see that we have an interface called IoTMediator that specifies the necessary methods that all concrete mediators must implement. In our example we will only have one concrete mediator that we have called ConcreteMediatorIoT. This concrete mediator is responsible for coordinating the different devices.
Well, let’s go step by step, the implementation and how it has changed compared to the previous example to achieve decouple the communication between the different devices.
Let’s start with the code of the abstract class IoTDevice which models the common logic of all devices.
import { IoTMediator } from "./iot-mediator";

export abstract class IoTDevice {
    constructor(public id: string, protected mediator: IoTMediator) {
      mediator.registerDevice(this);
    }

    // Method to send a message to another device
    sendMessage(receiverId: string, message: string): void {
      this.mediator.sendMessage(this, receiverId, message);
    }

    // Method to send measurement data to another device
    sendMeasurement(receiverId: string, data: any): void {
      this.mediator.sendMeasurement(this, receiverId, data);
    }

    // Method to receive a message from another device
    receiveMessage(senderId: string, message: string): void {
      this.mediator.receiveMessage(this, senderId, message);
    }

    // Method to receive measurement data from another device
    receiveMeasurement(senderId: string, data: any): void {
      this.mediator.receiveMeasurement(this, senderId, data);
        // Logic to process the received measurement data
   }
}
If we look at the constructor we see that we create a new device from its identifier and a mediator. When the device is instantiated, what is done is to register the device with the mediator. This is done through the registerDevice method which receives as an argument the instance of the Device class that has just been created, important, this method will be executed in the concrete device classes, that is, in the Sensor or Actuator class. In our case, we have merged in the constructor methods that could have been divided into methods such as the accessor method that would register the concrete mediator to the device, and another later that would register the device with the mediator. However, to simplify the code since the objective of the pattern is another, we have simplified it into a single method.
The rest of the common methods that all devices have are very simple, since we are delegating the responsibility to the mediator, through concrete mediator methods. The mediator only needs to know which device wants to perform the operation, it does this through the first argument with the reserved word this, and then the specific parameters of the operation that you want to perform. It is important to note that the interaction logic between colleagues has been delegated to the mediator.
The next thing is to see the specific devices, the Sensor class does not have anything extra since we have simplified it as much as possible and does not have any extra behavior. So we can see that the constructor simply invokes the class it extends.
import { IoTDevice } from "./iot-device";
import { IoTMediator } from "./iot-mediator";

export class Sensor extends IoTDevice {
    constructor(id: string, mediator: IoTMediator) {
      super(id, mediator);
    }
}
On the other hand, the Actuator class includes an extra method to the base class, which is receiveControlSignal, but if we look closely, we are doing exactly the same, we are delegating the communication responsibility to the mediator class which is responsible for putting the devices in contact.
import { IoTDevice } from "./iot-device";
import { IoTMediator } from "./iot-mediator";

export class Actuator extends IoTDevice {
    constructor(id: string, mediator: IoTMediator) {
      super(id, mediator);
    }

    // Method to receive a control signal from another device
    receiveControlSignal(senderId: string, signal: string): void {
      this.mediator.receiveControlSignal(this, senderId, signal);
    }
}
Now let’s see the concrete part of the pattern, the part corresponding to the mediators.
Let’s start by seeing the IoTMediator interface where you can see all the methods that the different colleagues use. To simplify we have included the method that we would only have in the Actuator. If we wanted to do it even better, instead of having a single concrete mediator, we could have two concrete mediators, one for the sensors and one for the actuators. However, we say the same again, we want to get the idea of how the mediator pattern works, once we have it, we can apply other different techniques or other patterns that allow us to continue decoupling the different parts of the code.
import { IoTDevice } from "./iot-device";

export interface IoTMediator {
    registerDevice(device: IoTDevice): void;
    sendMessage(sender: IoTDevice, receiverId: string, message: string): void;
    sendMeasurement(sender: IoTDevice, receiverId: string, data: any): void;
    receiveMessage(receiver: IoTDevice, senderId: string, message: string): void;
    receiveMeasurement(receiver: IoTDevice, senderId: string, data: any): void;
    receiveControlSignal(receiver: IoTDevice, senderId: string, signal: string): void;
}
The business logic of communication between the different devices is in the ConcreteIoTMediator class. In this class we have a Map of devices as an attribute. In this way, we have all the devices that want to interact with each other. To add devices to this data structure, we have designed the registerDevice method, which receives any device, both sensors and actuators, and is added to the Map.
We have prepared a private findOrError method that will search the Map for the device if it exists based on a device id and return it or if it does not exist, we will return an error that the device is not registered.
And now if we look at the sendMessage method, here we can see how the mediator is the one that coordinates the devices. The first thing that is done is to retrieve the receiver that is going to receive the message, and we can see how we invoke the receiveMessage method of the receiver once the message has been received from the sender. This device method will return to the mediator, and it will be the receiveMessage method that we have implemented in this class. The receiveMessage method is quite simple since it only performs a result trace to verify that all the communication between these devices is correct.
On the other hand, we see the sendMeasurement method which includes some logic, in which we explicitly check that the receiver must be of the Actuator class, otherwise, we return an error.
import { Actuator } from "./actuator";
import { IoTDevice } from "./iot-device";
import { IoTMediator } from "./iot-mediator";

export class ConcreteIoTMediator implements IoTMediator {
    private devices: Map<string, IoTDevice> = new Map();

    registerDevice(device: IoTDevice): void {
      this.devices.set(device.id, device);
    }

    private findOrError(id: string): IoTDevice {
      const device = this.devices.get(id);
      if (!device) {
        throw new Error(`Device ${id} not found.`);
      }
      return device;
    }

    sendMessage(sender: IoTDevice, receiverId: string, message: string): void {
      const receiver = this.findOrError(receiverId);

      console.log(`[${sender.id}] Sending message to ${receiverId}: ${message}`);
      receiver.receiveMessage(sender.id, message);
    }

    sendMeasurement(sender: IoTDevice, receiverId: string, data: any): void {
      const receiver = this.findOrError(receiverId);

      console.log(`[${sender.id}] Sending measurement data to ${receiverId}: ${JSON.stringify(data)}`);
      // Logic to send the data to the receiver
      if (!(receiver instanceof Actuator)) {
        return console.log("Error: Measurement data can only be sent to an Actuator.");
      }
      receiver.receiveMeasurement(sender.id, data);
    }

    receiveMessage(receiver: IoTDevice, senderId: string, message: string): void {
      const sender = this.findOrError(senderId);

      console.log(`[${receiver.id}] Message received from ${sender.id}: ${message}`);
      // Logic to process the received message
    }

    receiveMeasurement(receiver: IoTDevice, senderId: string, data: any): void {
      const sender = this.findOrError(senderId);
      console.log(`[${receiver.id}] Measurement received from ${sender.id}: ${JSON.stringify(data)}`);
      // Logic to process the received message
    }

    receiveControlSignal(receiver: IoTDevice, senderId: string, signal: string): void {
      const sender = this.findOrError(senderId);

      console.log(`[${receiver.id}] Receiving control signal from ${sender.id}: ${signal}`);
        // Logic to process the received control signal
  }
}
In this way, the mediators are the ones that implement the communication between the devices, or colleagues, and of course, we have to be careful not to make the mediators into God classes, since this would be an anti-pattern that we have to fix in a next phase of software development.
The client that makes use of the pattern, we must have a first phase of instantiation of all the necessary classes, mediator and different devices. Then each device makes use of its communication interface. For example, sensor1 uses the sendMessage method, or sensor2 the sendMeasurement method. Important, now the devices are not communicating directly, but an identifier is being specified with which to communicate.
import { Actuator } from "./actuator";
import { ConcreteIoTMediator } from "./concrete-iot-mediator";
import { Sensor } from "./sensor";
// Create the Mediator
const mediator = new ConcreteIoTMediator();

// Create IoT devices
const sensor1 = new Sensor("Sensor1", mediator);
const sensor2 = new Sensor("Sensor2", mediator);
const actuator1 = new Actuator("Actuator1", mediator);

// Example interaction between devices
sensor1.sendMessage("Sensor2", "How are you?");
sensor2.sendMeasurement("Actuator1", { temperature: 25, humidity: 60 });
actuator1.receiveControlSignal("Sensor2", "Turn off");

sensor1.sendMessage("Invalid-sensor", "How are you?");
And with this, we conclude by seeing the example, and we will see how this pattern is related to other design patterns.
Mediator Pattern: Relationship with other patterns
The Mediator pattern can be related to several other design patterns, as it is often used in conjunction with them to solve complex software design problems. Some of the related patterns include:
1. Observer Pattern: The Observer pattern is often used together with the Mediator pattern to allow objects to subscribe to and receive notifications about changes in other objects. This can help to keep objects loosely coupled and facilitate two-way communication.
2. Singleton Pattern: A mediator is sometimes implemented as a singleton to ensure that there is only one instance of the mediator in the system. This can be useful to ensure that all objects in the system communicate through the same centralized mediator.
3. Command Pattern: The Command pattern can be used together with the Mediator pattern to encapsulate requests as objects, allowing clients to parameterize other objects with requests, rather than sending requests directly. This can make it easier to implement systems with logging and undo capabilities.
4. Factory Method Pattern: The Factory Method pattern is often used to create instances of objects that interact through a mediator. This can help to hide the complexity of object creation and ensure that the correct implementations of objects are used in the system.
5. State Pattern: The State pattern is sometimes used together with the Mediator pattern to allow an object to change its behavior when its internal state changes. The mediator may be responsible for changing the state of an object and notifying other objects about the state change.
These are just a few examples of patterns that may be related to the Mediator pattern. Depending on the context and system requirements, other pattern combinations may emerge to address different design issues.
Conclusions
In general, the Mediator pattern is a valuable tool for designing systems with complex communication between objects, especially when looking for:
- Low coupling: Collaborating objects do not know each other directly, but communicate through the mediator. This reduces dependencies between objects and makes them easier to reuse and maintain.
- Centralization of communication logic: The logic of how objects interact is encapsulated in the mediator, making it easier to understand and modify.
- Communication flexibility: The mediator can be implemented in different ways to adapt to the specific needs of the system.
- Code reuse: The mediator can be reused in different parts of the system, reducing the amount of duplicate code.
However, the use of the Mediator pattern also has some disadvantages:
- Increased complexity: The system design may be more complex, since a new object (the mediator) must be added to manage communication.
- Potential performance loss: Indirect communication through the mediator may be slightly slower than direct communication between objects.
The most important thing about the Mediator pattern is not its specific implementation, but the ability to recognize the problem that this pattern can solve and when it can be applied. The specific implementation is not that important, as it will vary depending on the programming language used.
See this GitHub repo for the full code.